Repository
1. 基本概念
Repository 主要对数据源进行抽象。对于需要用于构建索引的数据可能存储在不同的存储系统中,比如 MySQL 数据库、Postgres 数据库和文件等等。为了支持从不同的存储系统中获取数据并把数据传送到 ProximaBE 用于后续的索引构建,我们提出了 Repository 的概念。 Repository 能够对接不同的存储系统,根据不同的存储系统实现相关的数据同步逻辑,并把数据的增、删、改等变化同步给 ProximaBE,从而使得相应的索引发生相应的变化。如下图所示:
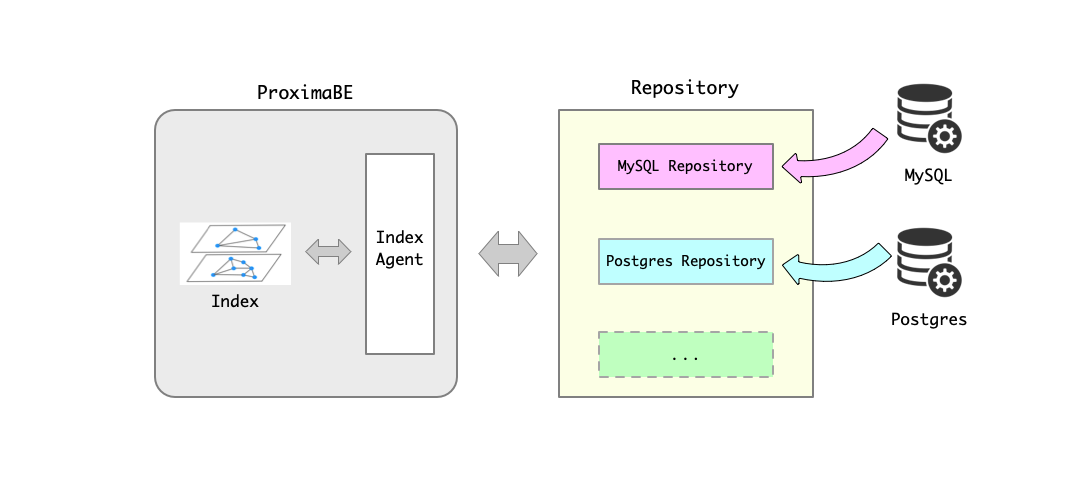
Repository 模块使得检索服务和原始数据的存储服务分离。从而拓展了 ProximaBE 的应用场景,增强了系统的可拓展性。当需要支持新的存储系统时,仅需实现相应的 Repository ,而不会影响 ProximaBE 的检索服务。
2. Repository 类型
按照设计每种存储系统对应一个相应的 Repository。例如,对于 MySQL 数据库对应的为 MySQL Repository,对于 Postgres 数据库对应 Postgres Repository 等等。 当前版本中仅支持 MySQL Repository,后续根据需要会添加 Postgres Repository 等更多的 Repository。
3. MySQL Repository
3.1. 基本概念
MySQL Repository 对接的数据源为 MySQL 数据库。MySQL Repository 利用 MySQL 的主从复制原理实现对 MySQL 数据库的实时订阅。
MySQL 的主从复制原理如下图所示:
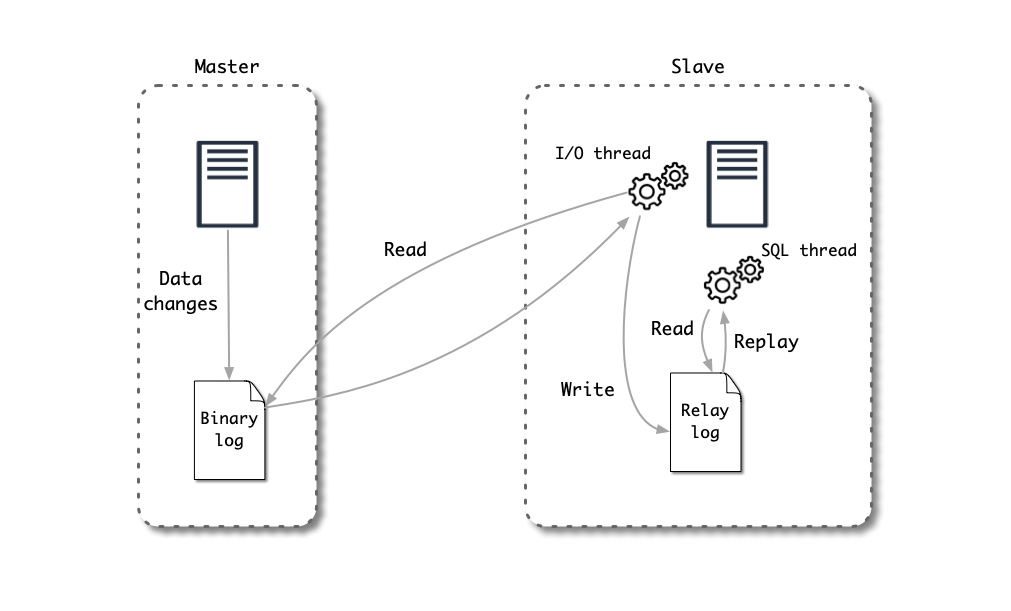
- MySQL 主服务器 (master) 将数据变更写入二进制日志( binary log)
- MySQL 从服务器 (slave) 将主服务器的 binary log 中的事件(event) 拷贝到它的中继日志(relay log)
- MySQL 从服务器重放中继日志中的事件,将数据变更反映它自己的数据中
MySQL Repository 的工作原理:
- MySQL Repository 模拟 MySQL Replica 原理,把自己伪装为 MySQL 从服务器,向 MySQL 主服务器发送 dump 请求
- MySQL 主服务器收到 dump 请求,开始推送 binlog 给 MySQL Repository
- MySQL Repository 解析相应的 binlog,解析为 ProximaBE 所需要的数据格式后发送给 ProximaBE
- ProximaBE 中的 Index Agent 模块接收到数据,并把数据传送给后续的索引构建模块
3.2. 快速开始
第一步: MySQL 基本设置
为了保证能够通过 binlog 正确获取 MySQL 数据库中数据,数据库和数据需要符合特定的设置:
- MySQL 版本 5.7.x
- 开启 binlog
- binlog 记录模式为 ROW 模式
- 表结构中含有自增列
MySQL 可以在文件 my.cnf 文件中进行设置。示例如下代码所示:
[mysqld]
server-id           = 12000
log_bin             = binlog
binlog_format       = ROW
以 Docker 启动 MySQL:
$ docker run -p 3306:3306 -e MYSQL_ROOT_PASSWORD=root -d mysql:5.7
第二步: 拉取 MySQL Repository 镜像
安装前提见快速入门部分。这里不再赘述。
拉取 MySQL Repository Docker 镜像:
$ sudo docker pull ghcr.io/proximabilin/proxima-be
第三步: MySQL Repository 配置
创建配置文件、log 文件、数据文件所存储的路径:
$ mkdir -p $HOME/proxima-be/{conf,data,log}
首先需要启动 ProximaBE ,启动方式可以参照快速入门所述,这里不再赘述。在本示例中,假设 ProximaBE 和 MySQL Repository 在同一台机器且 ProximaBE 的 grpc_listen_port 为 16000。则 MySQL Repository 相应的配置文件可以如下所示: ( 位置:$HOME/proxima-be/conf/mysql_repo.conf):
common_config {
    log_directory: "/var/lib/proxima-be/log/"
    log_file: "mysql_repo.log"
}
repository_config {
    index_agent_addr: "127.0.0.1:16000"
}
NOTE : 以上配置中 index_agent_addr 和 ProximaBE 的配置有关。表示 ProximaBE 的 IP 地址和 ProximaBE 的grpc_listen_port 值。
第四步: 映射文件启动容器
$ sudo docker run -d --name mysql-repository  \
      -v $HOME/proxima-be/conf:/var/lib/proxima-be/conf \
      -v $HOME/proxima-be/data:/var/lib/proxima-be/data \
      -v $HOME/proxima-be/log:/var/lib/proxima-be/log \
      ghcr.io/proximabilin/proxima-be \
      /var/lib/proxima-be/bin/mysql_repository --config /var/lib/proxima-be/conf/mysql_repo.conf
3.3. 详细配置
Common Config:
| 参数名 | 类型 | 默认值 | 必需 | 说明 |
|---|---|---|---|---|
| logger_type | string | “RepositoryAppendLogger” | 否 | 目前支持一种Logger RepositoryAppendLogger–自动增加切割日志 |
| log_directory | string | “./log/” | 否 | 日志目录 |
| log_file | string | “mysql_repository.log” | 否 | 日志名称 |
| log_level | uint32 | 2 | 否 | 最低打印日志级别 1–DEBUG 2–INFO 3–WARN 4–ERROR 5–FATAL |
Repository Config:
| 参数名 | 类型 | 默认值 | 必需 | 说明 |
|---|---|---|---|---|
| index_agent_addr | string | “0.0.0.0:16000” | 是 | index agent IP 地址和端口号 |
| repository_name | string | “mysql_repository” | 否 | repository 名字 |
| load_balance | string | "" | 否 | RPC 负载均衡 |
| batch_size | uint32 | 64 | 否 | Repository 向 ProximaBE 传送数据的最大 batch 大小 |
| batch_interval | uint32 | 5000 | 否 | Repository 向 ProximaBE 传送数据的最大时间间隔。单位“微妙” |
| max_retry | int | 3 | 否 | RPC 重试次数 |
| timeout_ms | int | 500 | 否 | RPC 超时时间,单位“毫秒” |
3.4. MySQL 表配置说明
想要要通过 MySQL Repository 的方式来自动进行数据同步,需要满足下面几点:
- 用户定义的 MySQL 表中必须含有一个自增列 ID。
- 在集合中定义的向量索引字段,在 MySQL 表中对应的字段必须是 VARCHAR 类型,格式为 Json Array 的字符串,其它格式的暂时不支持,例如:
[1.0, 2.0, 3.0, 4.0, 5.0, 6.0, 7.0, 8.0] - 在集合中定义的向量正排字段,可以是 MySQL 中支持的常规类型,目前 geometry 和 json 等复杂类型暂时不支持配置。
示例:
# 1、创建MySQL表
CREATE TABLE `test_table` (
 `id` int(11) NOT NULL AUTO_INCREMENT,  # 自增列 ID
 `name` varchar(64) NOT NULL,           # 姓名
 `age` int(11) NOT NULL,			    # 年龄
 `score` float NOT NULL,			    # 信用分
 `face` varchar(10240) NOT NULL,        # 人脸向量,假定为4维的float
 PRIMARY KEY (`id`)
) ENGINE=InnoDB DEFAULT CHARSET=utf8;

# 2、插入数据
insert into test_table(name, age, score, face) values ('xiaoming', 23, 95.3, '[1.0, 2.0, 3.0, 4.0]');
insert into test_table(name, age, score, face) values ('xiaohua', 24, 85.3, '[2.5, 3.0, 3.5, 4.5]');

# 3、创建集合的配置
#  face  -> 向量索引列(IndexColumn)
#  id, name, age, score -> 正排列(ForwardColumn)