图片搜索
以图搜图是互联网应用中的常见功能,各大搜索引擎都提供了通过图片搜索相似图片的功能,另外“拍立淘”也是基于图片搜索实现的。本文介绍如何基于 Proxima Bilin Engine 来实现图片搜索功能,主要包括三个步骤:图片特征抽取、图片底库入库、在线检索。
图片特征抽取
为了实现图片搜索,需要从图片中抽取特征向量,用于建立向量索引并做 KNN 检索。一般是通过深度学习模型中的最后一层全连接层作为描述图片的特征。在这里,我们选用预训练好的 ResNet18 模型来抽取图片特征,其输入要求至少为 224*224 的 RGB 图片且已经做过标准化,输出特征为 512 维的float。
class FeatureExtractor(object):
    def __init__(self):
        self.model = models.resnet18(pretrained=True)
        self.model.eval()
        self.layer = self.model._modules.get("avgpool")
        self.transform_pipeline = transforms.Compose([transforms.Resize((224, 224)),
                                                      transforms.ToTensor(),
                                                      transforms.Normalize(mean=[0.485, 0.456, 0.406],
                                                                           std=[0.229, 0.224, 0.225])])

    def get_feature(self, img):
        t_img = Variable(self.transform_pipeline(img)).unsqueeze(0)
        feat_vec = torch.zeros(512)

        def copy_data(m, i, o):
            feat_vec.copy_(o.data.squeeze())

        h = self.layer.register_forward_hook(copy_data)
        self.model(t_img)
        h.remove()

        return feat_vec.tolist()
fe = FeatureExtractor()
为了满足 ResNet18 的要求,我们定义了 transform_pipeline 来做图片 resize 和标准化。然后获取 avgpool 层,在 get_feature 中通过注册钩子来将特征数据拷贝到 feat_vec 中。
图片底库入库
我们以 Caltech 101 数据集为例,它包含101类的图片,每一类包括50张左右的图片。图片预先下载解压到 data/101_ObjectCategories 目录。
首先需要加载图片,由于 Caltech 101 数据集中部分图片是灰度图片,不满足,ResNet18 的要求,get_image_feature 中会做判断,必要时将其转换为 RGB 图片。
def get_image_feature(image_path):
    i = Image.open(image_path)
    if i.mode == 'L':
        i = i.convert('RGB')
    return fe.get_feature(i)
通过 get_feature_batch 函数来分批加载图片并抽取特征,一个 batch 内的图片特征会作为一次网络请求发送到 Proxima Bilin Engine 。
def get_feature_batch(batch_count=100):
    result = []
    dataset_dir = 'data/101_ObjectCategories'
    p = pathlib.Path(dataset_dir)
    for i in p.glob('**/*.jpg'):
        image_path = str(i)
        result.append((get_image_feature(image_path), image_path))
        if len(result) >= batch_count:
            yield result
            result.clear()
    if result:
        yield result
使用 docker 容器启动 Proxima Bilin Engine 服务。
docker run -d --name proxima_be -p 16000:16000 -p 16001:16001 \
    reg.docker.alibaba-inc.com/proxima/proxima-be
设置连接信息,创建 client。
from pyproximabe import *

HOST = '127.0.0.1'

GRPC_PORT = 16000

client = Client(HOST, GRPC_PORT)
创建 collection
collection_name = 'image_search'
index_column = IndexColumnParam(name='feature',
                                dimension=512,
                                data_type='VECTOR_FP32',
                                index_type=IndexType.PROXIMA_GRAPH_INDEX)
collection_config = CollectionConfig(collection_name=collection_name,
                                     index_column_params=[index_column],
                                     forward_column_names=['image_path'])
status = client.create_collection(collection_config)
if not status.ok():
    print('create collection error:' + str(status))
print('Create collection successfully!')
在 Proxima Bilin Engine 中同时支持向量列和正排列。在上面的代码中,我们指定了创建一个向量列,它包含 512 维的 float 向量,使用 graph 索引;还指定了一个名为 image_path 的正排列,用于存储图片的路径。
图片入库
from itertools import count
pk_gen = count()
row_meta = WriteRequest.RowMeta(index_column_metas=[WriteRequest.IndexColumnMeta(name='feature',
                                                                                 data_type='VECTOR_FP32',
                                                                                 dimension=512)],
                                forward_column_names=['image_path'],
                                forward_column_types=[DataType.STRING])
for batch in get_feature_batch():
    rows = []
    for image_feature, image_path in batch:
        rows.append(
            WriteRequest.Row(primary_key=next(pk_gen),
                         operation_type=WriteRequest.OperationType.INSERT,
                         index_column_values=[image_feature],
                         forward_column_values=[image_path]))
    write_request = WriteRequest(collection_name=collection_name,
                             rows=rows,
                             row_meta=row_meta)
    status = client.write(write_request)
    if not status.ok():
        print('Fails, err=%s' % status)
        break
    print('.', end='')
print('write done')
Proxima Bilin Engine 要求向量有唯一整形标识,我们使用 itertools.count 来生成。上面的代码中,先创建了 row_meta,然后逐行添加向量,最后将 write_request 发送到服务端。
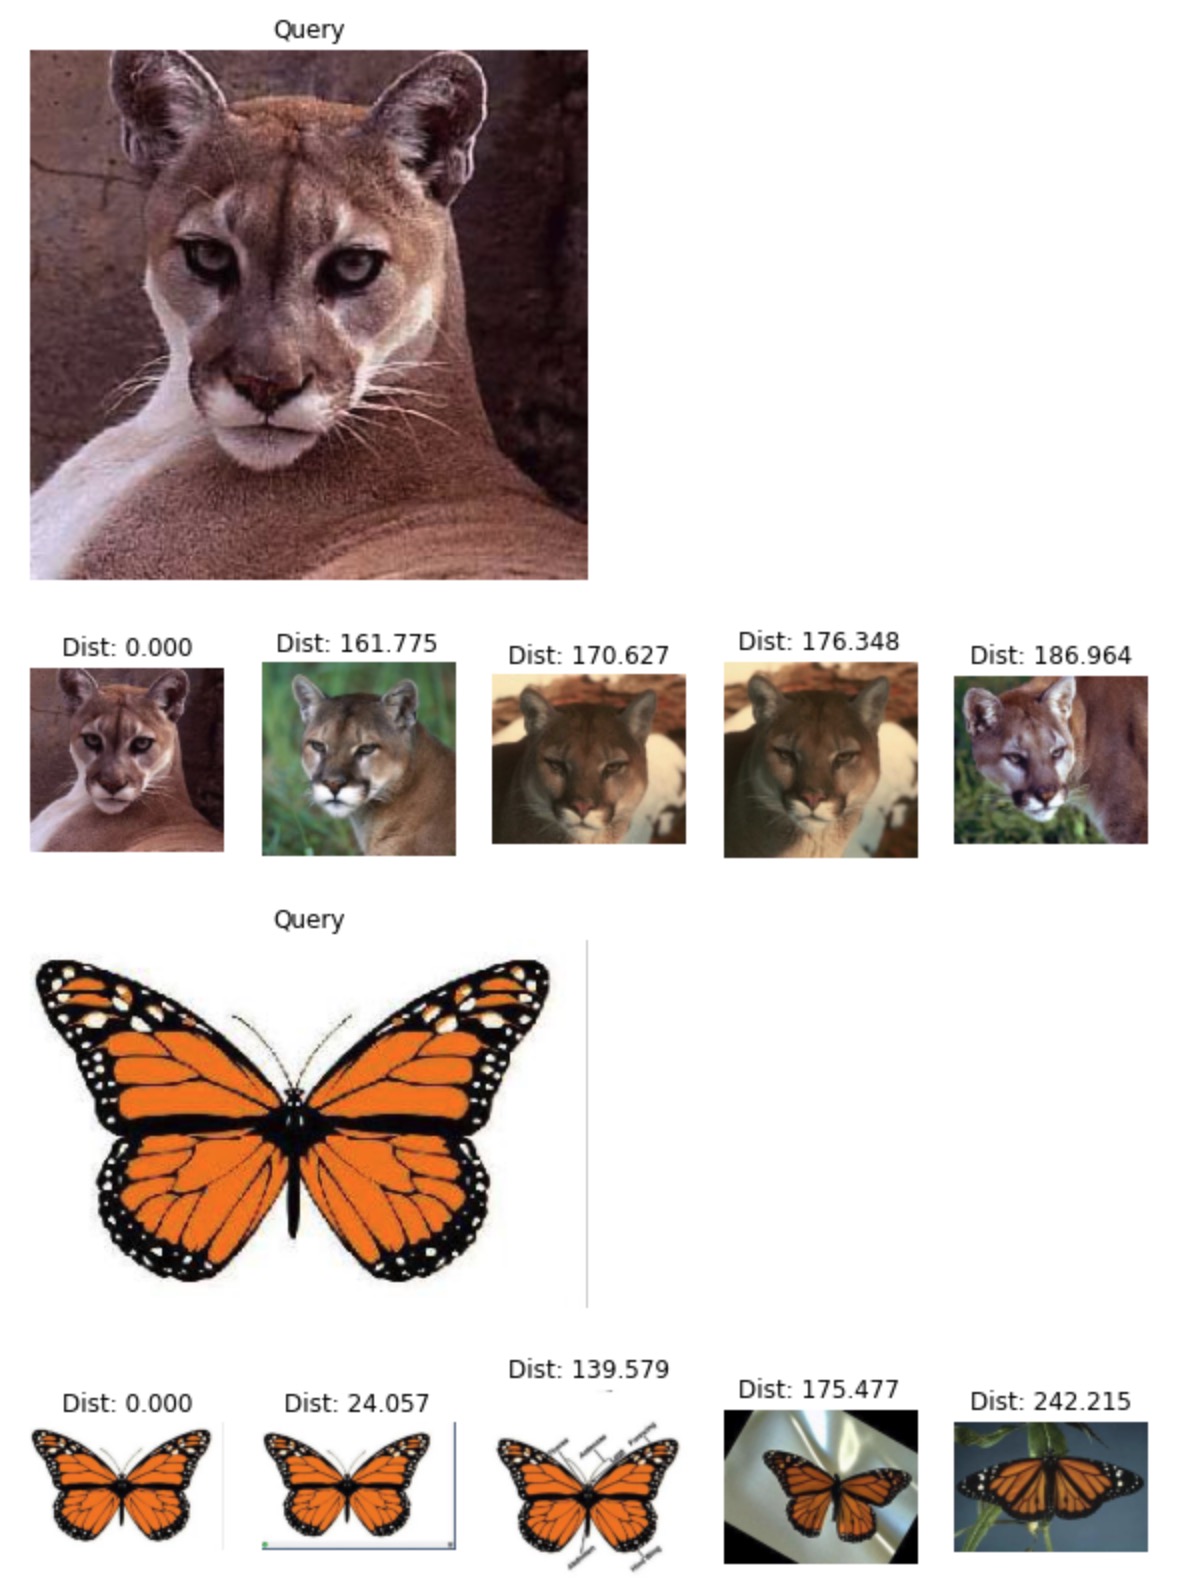
图片检索
def search_and_show(image_path):
    query_vector = get_image_feature(image_path)
    status, knn_res = client.query(collection_name,
                               column_name='feature',
                               features=[query_vector],
                               data_type='VECTOR_FP32',
                               topk=5)
    assert status.ok()
    query_img = Image.open(image_path)
    fig_query, ax_query = plt.subplots(1,1, figsize=(5,5))
    ax_query.imshow(query_img)
    ax_query.axis('off')
    ax_query.set_title("Query")

    neighbors = knn_res.results[0]
    doc_count = len(neighbors)
    fig, ax = plt.subplots(1, doc_count, figsize=(10,10))
    for i, doc in enumerate(neighbors):
        doc_image_path = doc.forward_column_values['image_path']
        ax[i].imshow(Image.open(doc_image_path))
        ax[i].axis('off')
        ax[i].set_title("Dist: %.3f" % doc.score)
search_and_show('data/101_ObjectCategories/cougar_face/image_0018.jpg')
search_and_show('data/101_ObjectCategories/butterfly/image_0001.jpg')
抽取到图片特征后,发送 query 请求到服务端,然后将结果以图片的方式展示出来。
需要说明的是,Proxima Bilin Engine 支持边插入边检索,不需要全部入库完即可提供检索服务。